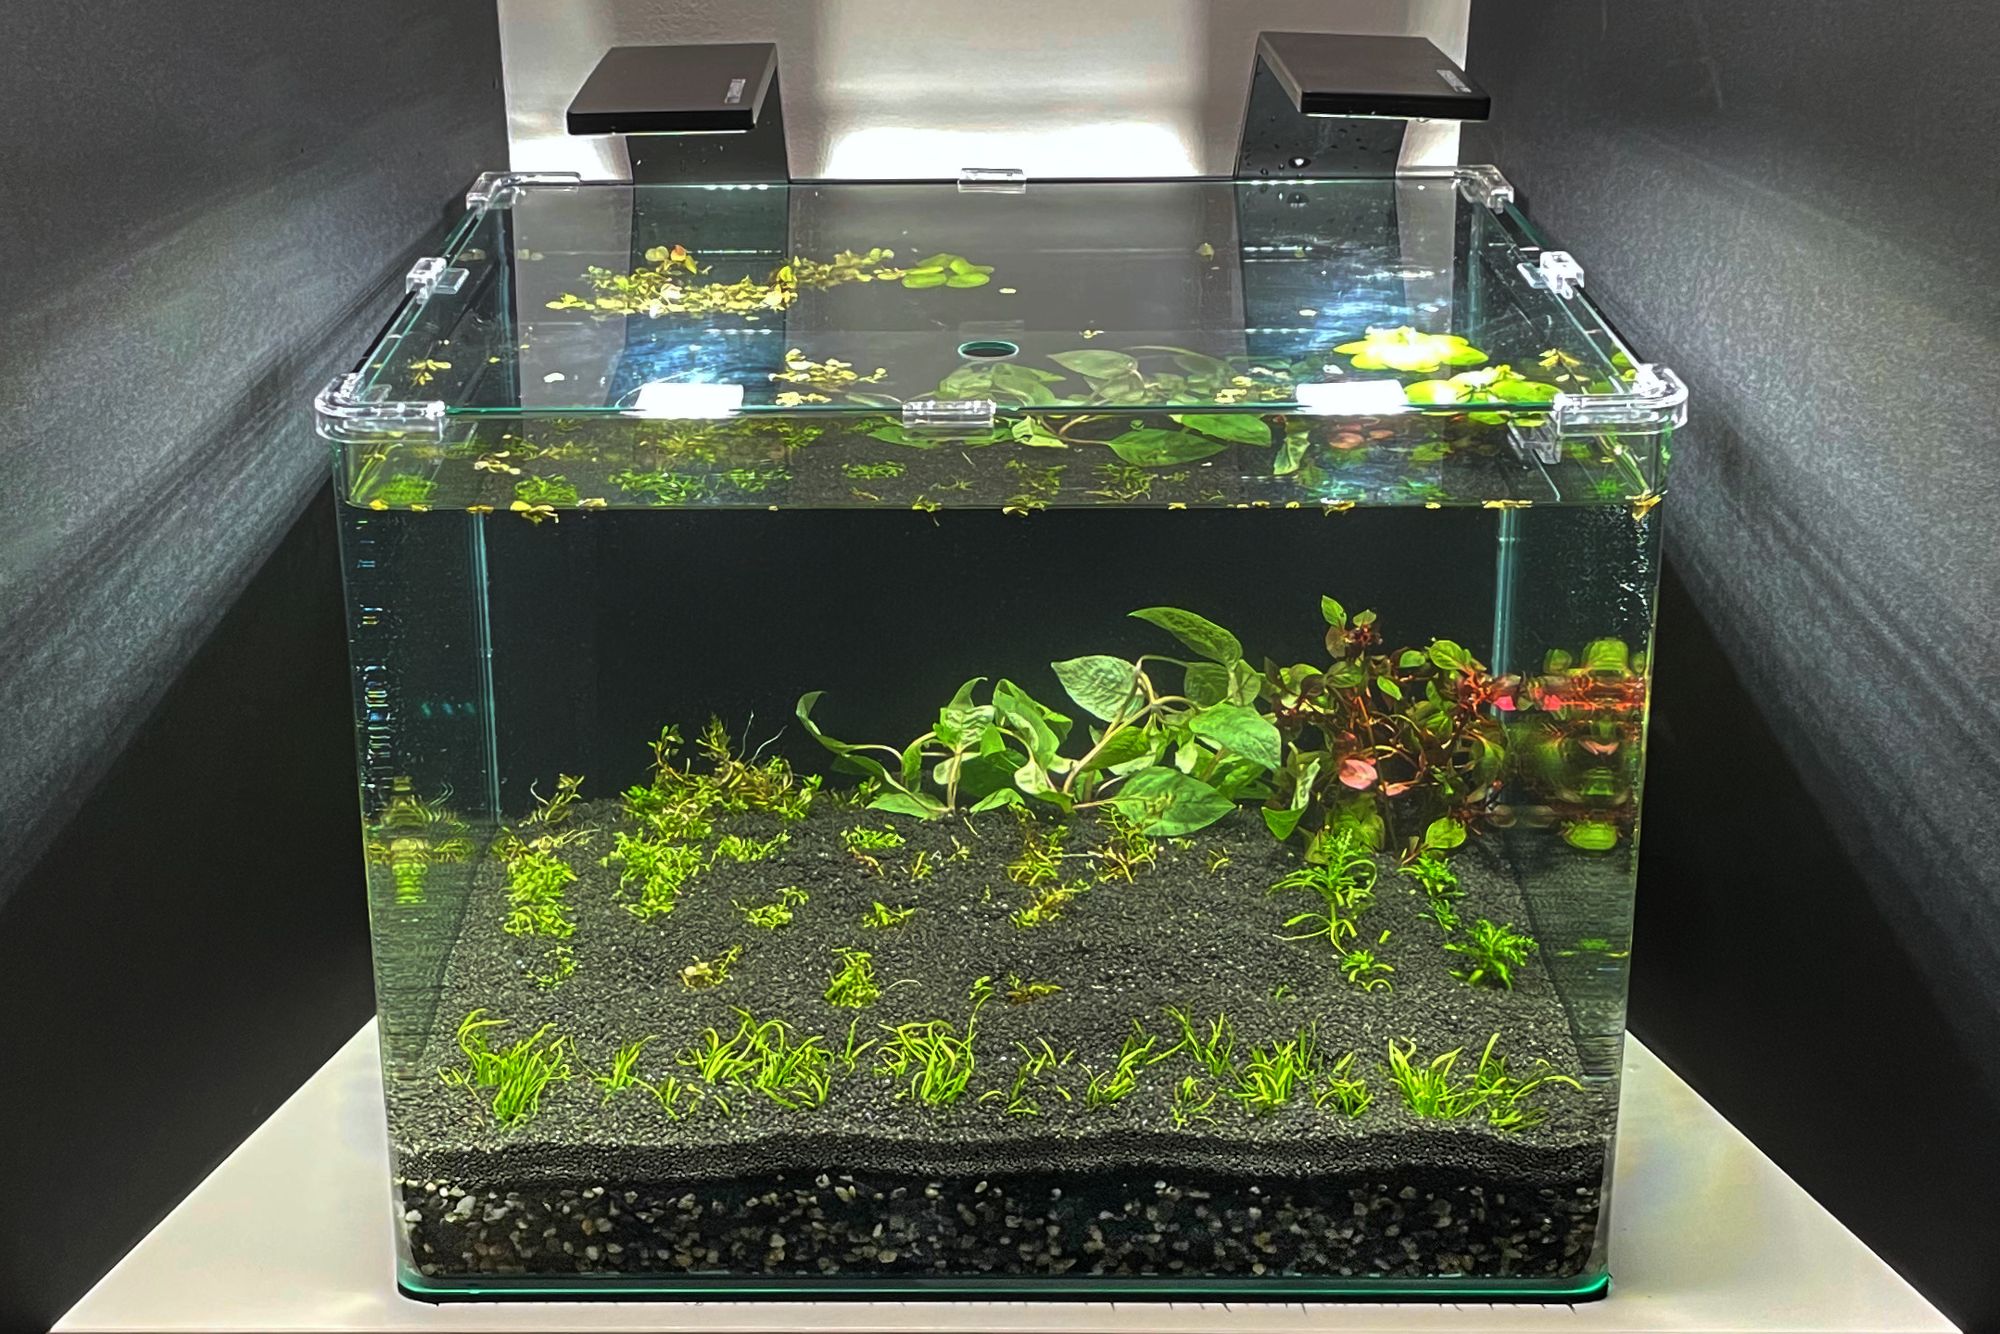
The majority of aquariums use technology and additives like filter (medium)s, water changes, chemicals, CO² injection, fertilizers, nutrients, etc. in order to create water conditions that come as close as possible to natural ecosystems. But what if I told you that you can have an aquarium that doesn’t need any of the artificial means and doesn’t recreate a natural ecosystem but actually is one?
One way to achieve this is using the Walstad Method, named after Diana Walstad, a Californian biologist and aquarium enthusiast. The goal here is to create an aquarium that is as low-maintenance and low-tech as possible, while providing a healthy and natural living space to both animals and plants.
Using this or a similar method can also be an excellent starting point into the world of aquascaping and fish-keeping for absolute beginners that don’t want to spend a lot of money on equipment at first.
This article will give a beginner-friendly, in-depth overview on how to create a "No Filter Aquarium" that is very loosely based on the Walstad Method and provides easy to follow step-by-step instructions. Follow along for details on needed materials, setup and updates on the tank status.
How does a no filter aquarium work?
This setup is designed to become a healthy ecosystem without any additives. The 3 reasons we don't need a filter are:
- The special substrate layer build will host most of the good bacteria that would otherwise live in the filter.
- The large number of fast-growing plants we use here will deliver the necessary oxygen and filter out unwanted nutrients naturally.
- We are not overstocking the aquarium, so that we don't have any excess animal waste that needs to be filtered out.
The nutrients and fertilization for the plants are coming from
- the substrate layer itself and
- the waste of the livestock which has been converted into nutrients by the healthy bacteria in the substrate.
We do not intent to do any water changes (except when the ammonia or nitrite levels peak to keep the livestock safe). This is only possible, because we will not overfeed or overstock the aquarium. By controlling the waste and keeping a balanced ecosystem, water changes are not required.
Materials used
Note: We bought all of the mentioned products ourselves and used them in the pictured build. We're not affiliated with any of the manufacturer's but receive a small commission if you buz from the provided links. This helps us offset the costs of running this website and enables us to create more cool projects in the future. Thanks for your support!
- Aquarium or Shrimp Tank (10 Gal) Complete
- Optional Nano LED
- Plant growth substrate
- Soil
- Gravel 2-7 mm
- Sand 1-2 mm
- Mesh bags
- Plants
- Livestock
At the time of writing this article, the materials used roughly added up to a total of $ 490 dollars (incl. tax and shipping). $ 160 for the plants and livestock and $ 330 for the equipment and substrate.
You can save money by buying second hand equipment or buying plants/livestock from a different seller or the same to save on shipping. I recommend to buy the Fluval light when buying the Penn-Plax aquarium as the included light is not very good. On the other hand, you do not need to buy the Fluval light when buying the Dennerle Complete Shrimp tank as the light is going to be sufficient. But either way, the Fluval light is better than the delivered one.
Please Consider
- Tank size
- Aquarium light
- Aquarium Placement
- Substrate Build
- Planting
- Fill with Water
- Fish
- Maintenance
Aquarium / Tank size
The minimum officially recommended tank size for the Walstad Method is 5-gallons / 20-liters. Please be aware that this tank size is not suitable for any kind of fish and we definitely don’t recommend it. In a 5-gallons / 20-liter tank you can only keep a few snails and shrimp. If this is what you're looking for - perfect. But if you want to keep fish then a 10- or even 20-gallon tank is the better choice.
When it comes to aquariums bigger is always better. This mainly has to do with maintaining the balance of the ecosystem. The larger the amount of water you're working with, the less impact your subsequent actions will have on the water parameters. On the contrary, if you want to maintain a small aquarium there are a lot of things that can go wrong, which can put you off the hobby.
This is why we don’t recommend using a tank with less than 35l / 10 gallons of water volume. Especially in the setup at hand our goal is to establish a stable natural ecosystem without any additives that would be extremely difficult to establish and maintain with a smaller aquarium.
In this guide we are using a 10-gallons / 35-liter aquarium with a rubber matt underneath.
Light
Good lighting is also mandatory for a healthy ecosystem. When it comes to choosing the right light, it is best to choose the light by its temperature (measured in kelvin) and lumen (brightness). In our opinion and mostly recommended the best temperature is roughly 6.500 K. It is very white and makes you plants look very lush.
The amount of Lumen required needs to be calculated in regards to you tank size. In this guide we are using 2 x 500 Lumen LED’s. Leaving us with 28 Lumen per liter (1000/35) or 100 Lumen per gallon (1000/10). This is close to the maximum amount of light you should put into any aquarium and will be suitable for even the most demanding plants. You can also use only one LED or two with half the amount of lumen.
It is recommended to leave your light on for up to 6 hours in new aquariums and up to 8 hours in established ones that have already been cycled. This is to prevent algae, as the amount of light is one important factor for algae growth. With this setup we have decided to leave the light on for 12 hours every day in order to speed up plant growth significantly. Since we don't use fertilizer or CO² in this tank, light is one of the only factors we have to speed up growth.
Aquarium Placement
The final placement of the aquarium is very important. In this guide the aquarium is placed in a hallway with not direct sunlight. This is also one of the main reasons why we can get away with 12 hours of light every day.
In case you do not have a shaded place where to put your tank, the lighting needs to be adjusted to the natural lighting cycle where you are living (e.g., when the sun has risen at 8 am and sunset starts at 8 pm we would synchronize our lighting timing).
Pro Tip: Aquariums are best placed in shady places with no direct sunlight. This will definitely eliminate an important factor in getting algae.
Prepare substrate / soil layer for planting
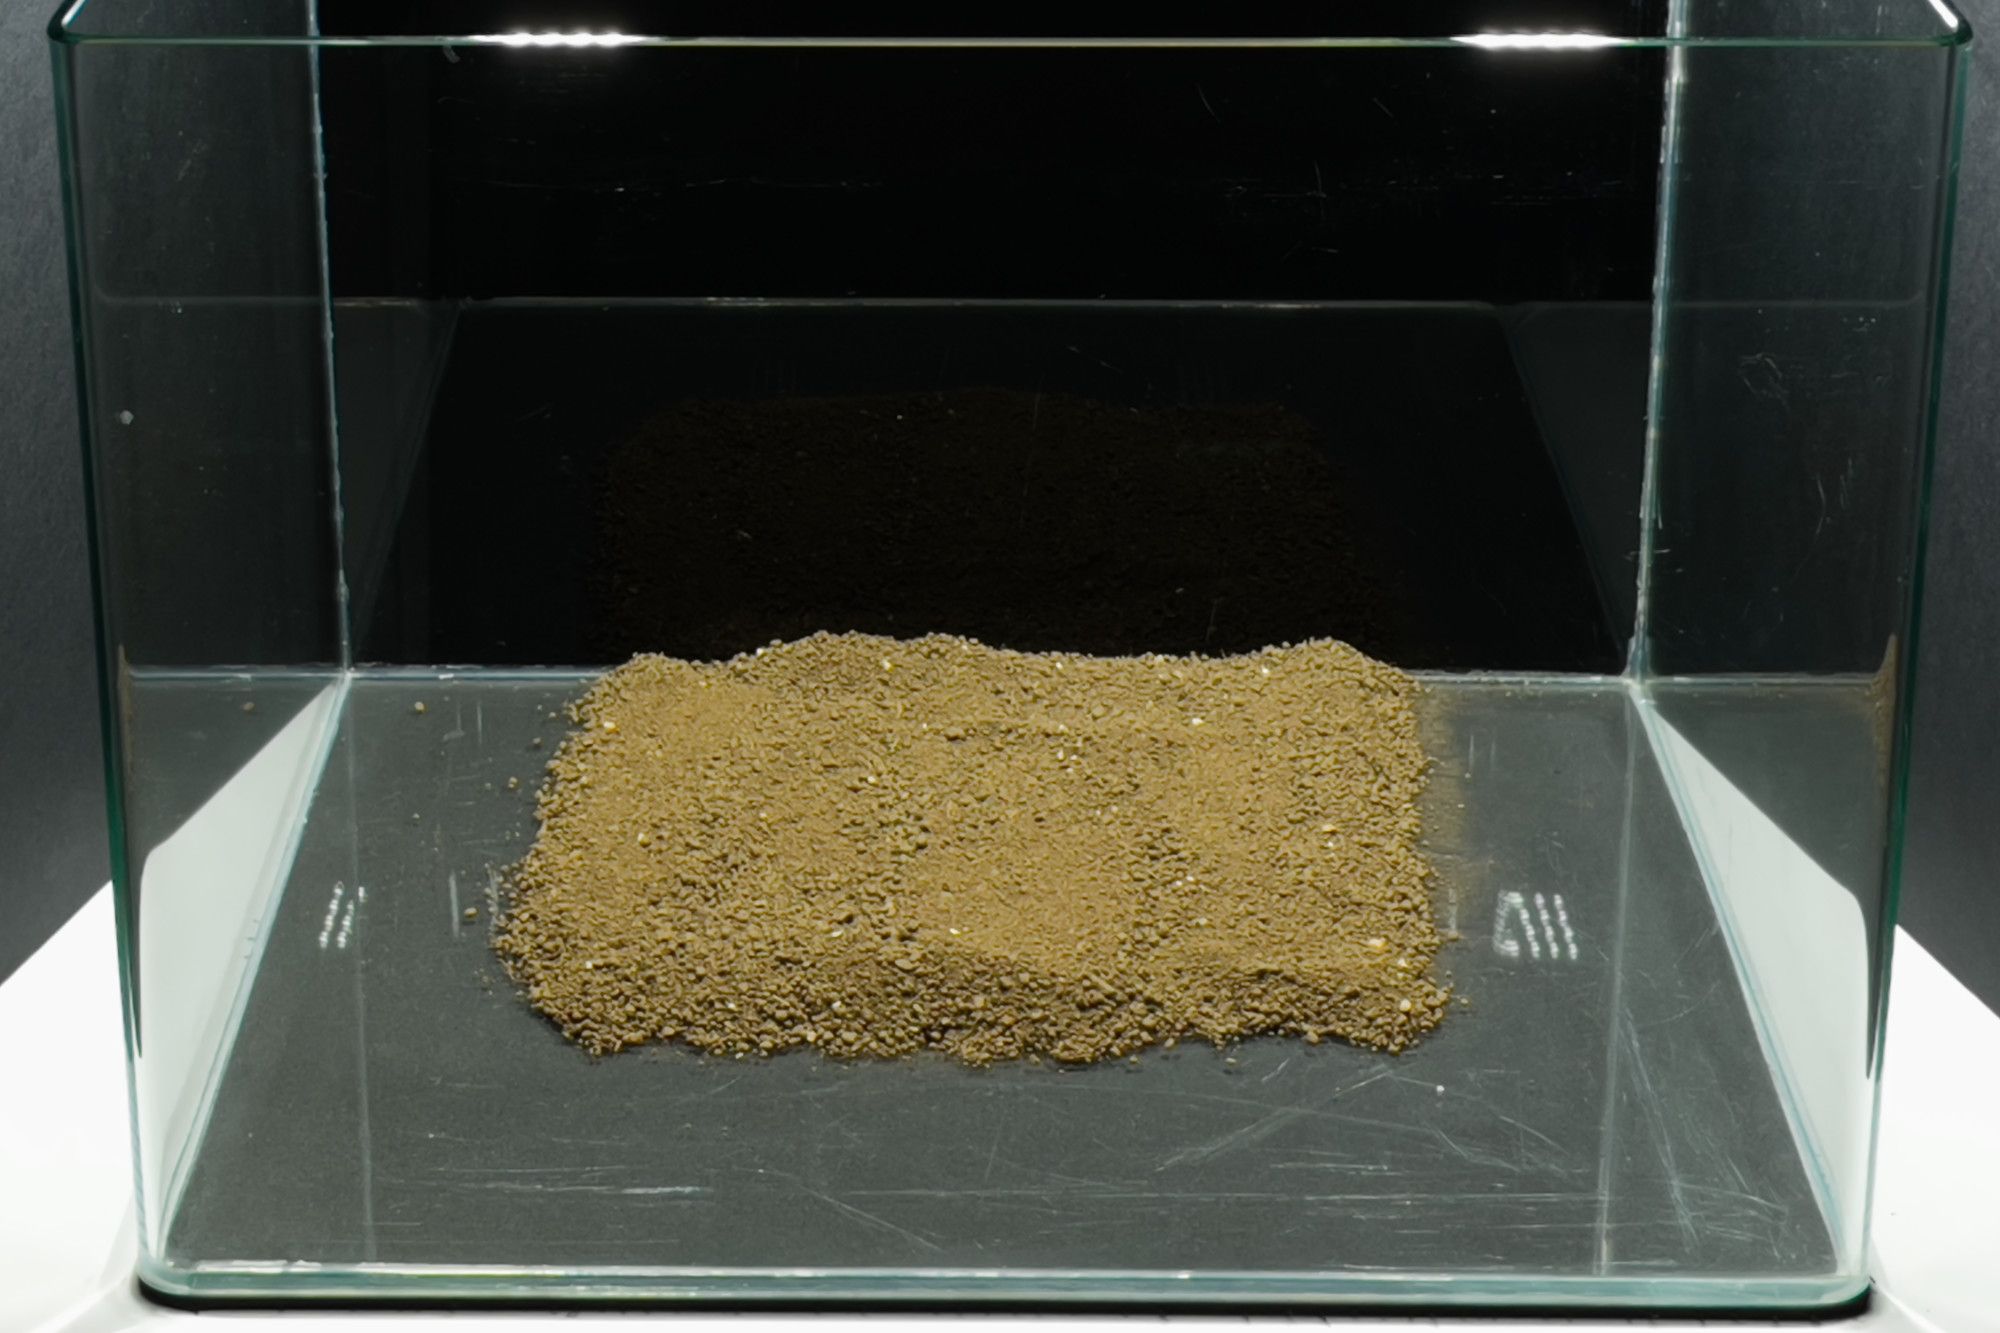
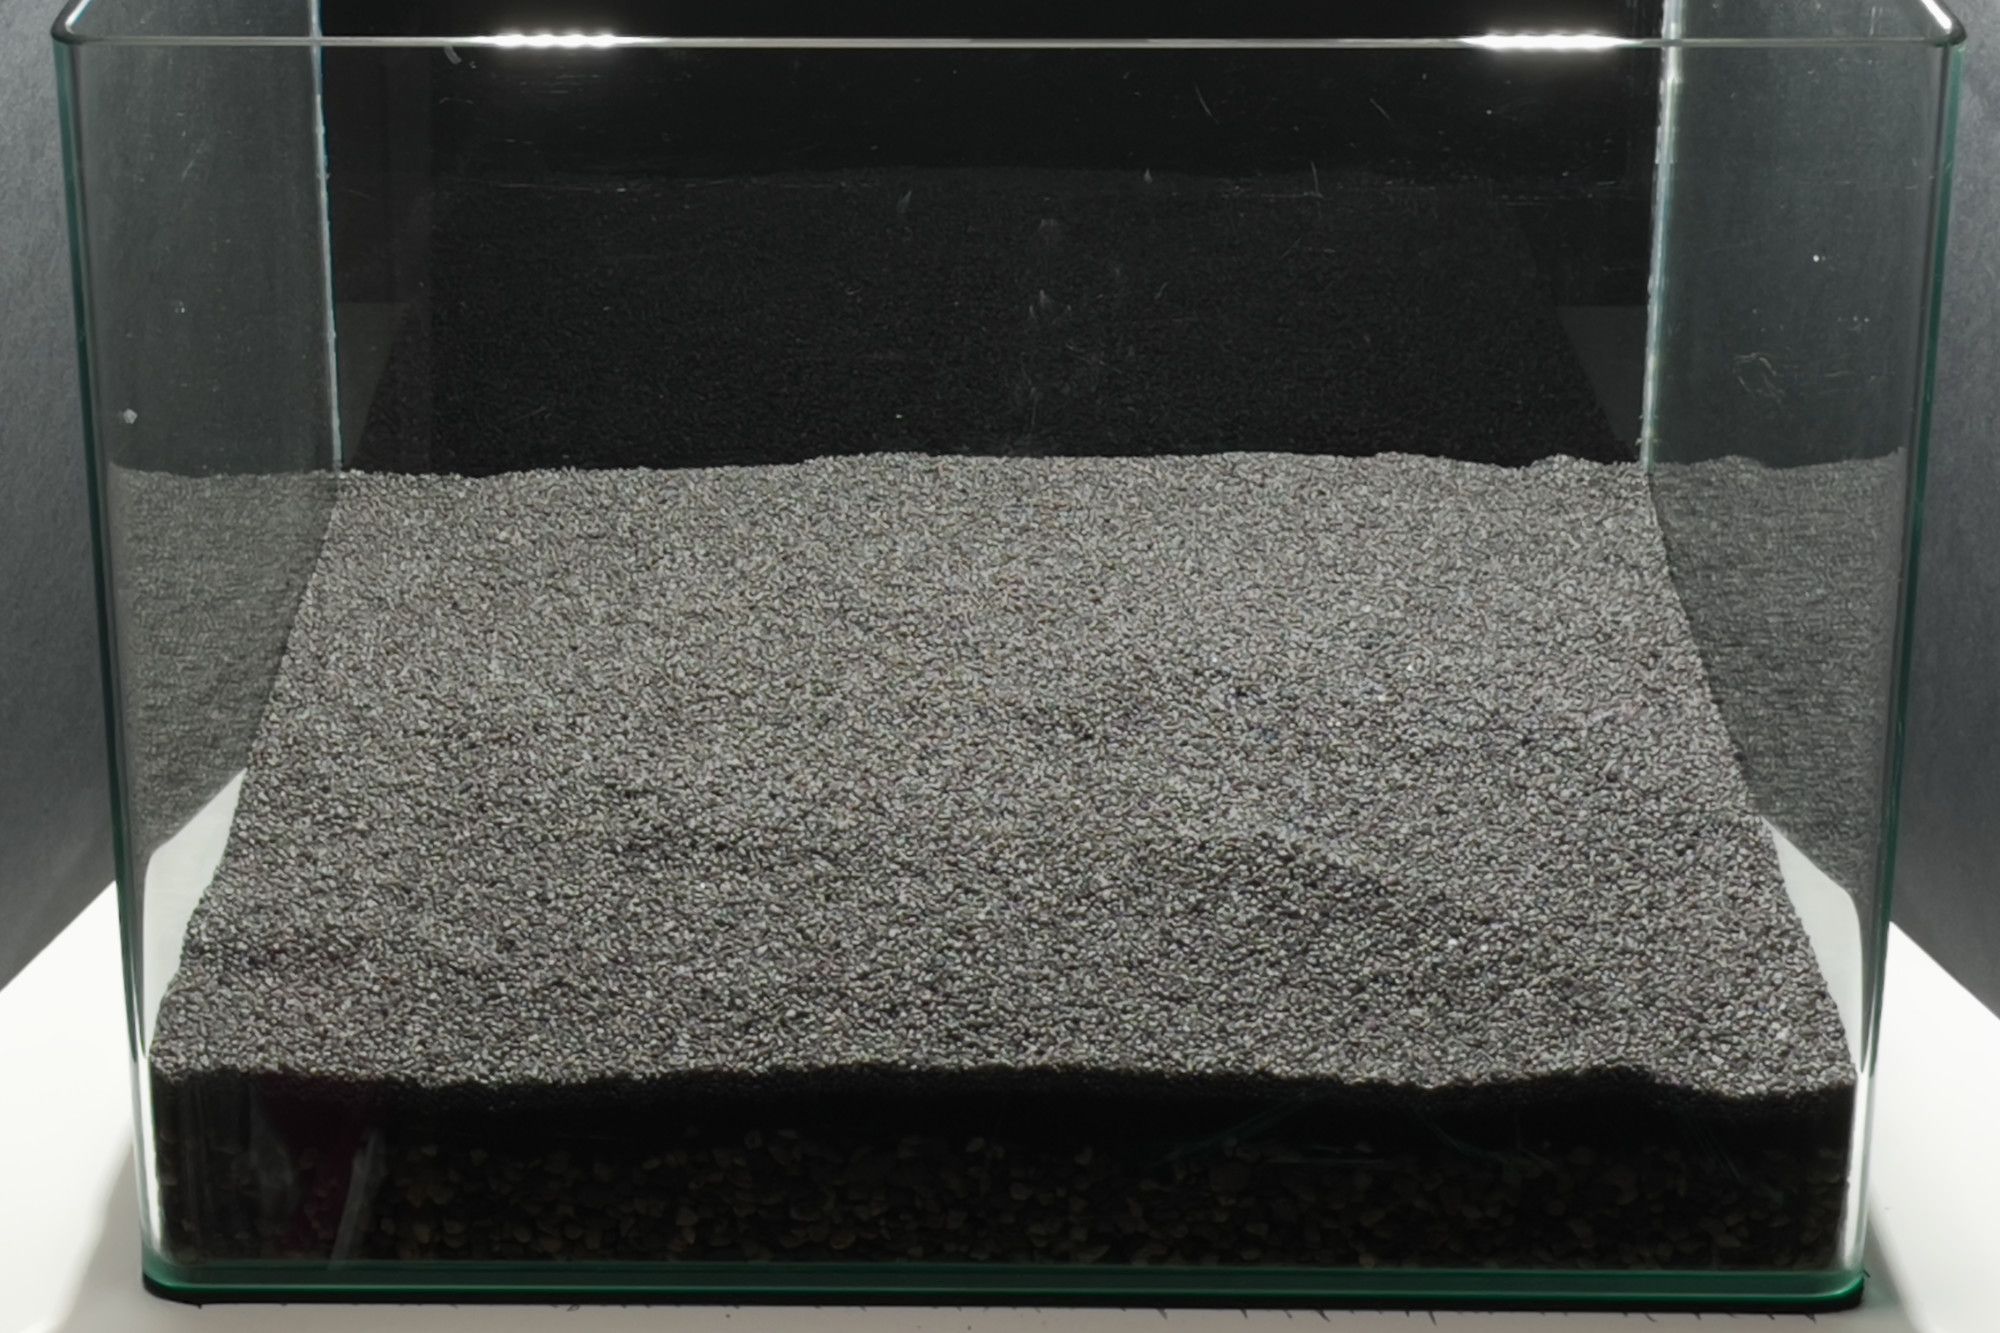
- We start with the Tropica plant growth substrate. You will need a layer of about 0.5 inch / 1 cm thick layer which is about 2 cm / 1 inch away from the front and side panels of the aquarium. Use a credit card or spatula to push the substrate together inwards.
This layer is important, as our plants will extract the required nutrients from it for growth.
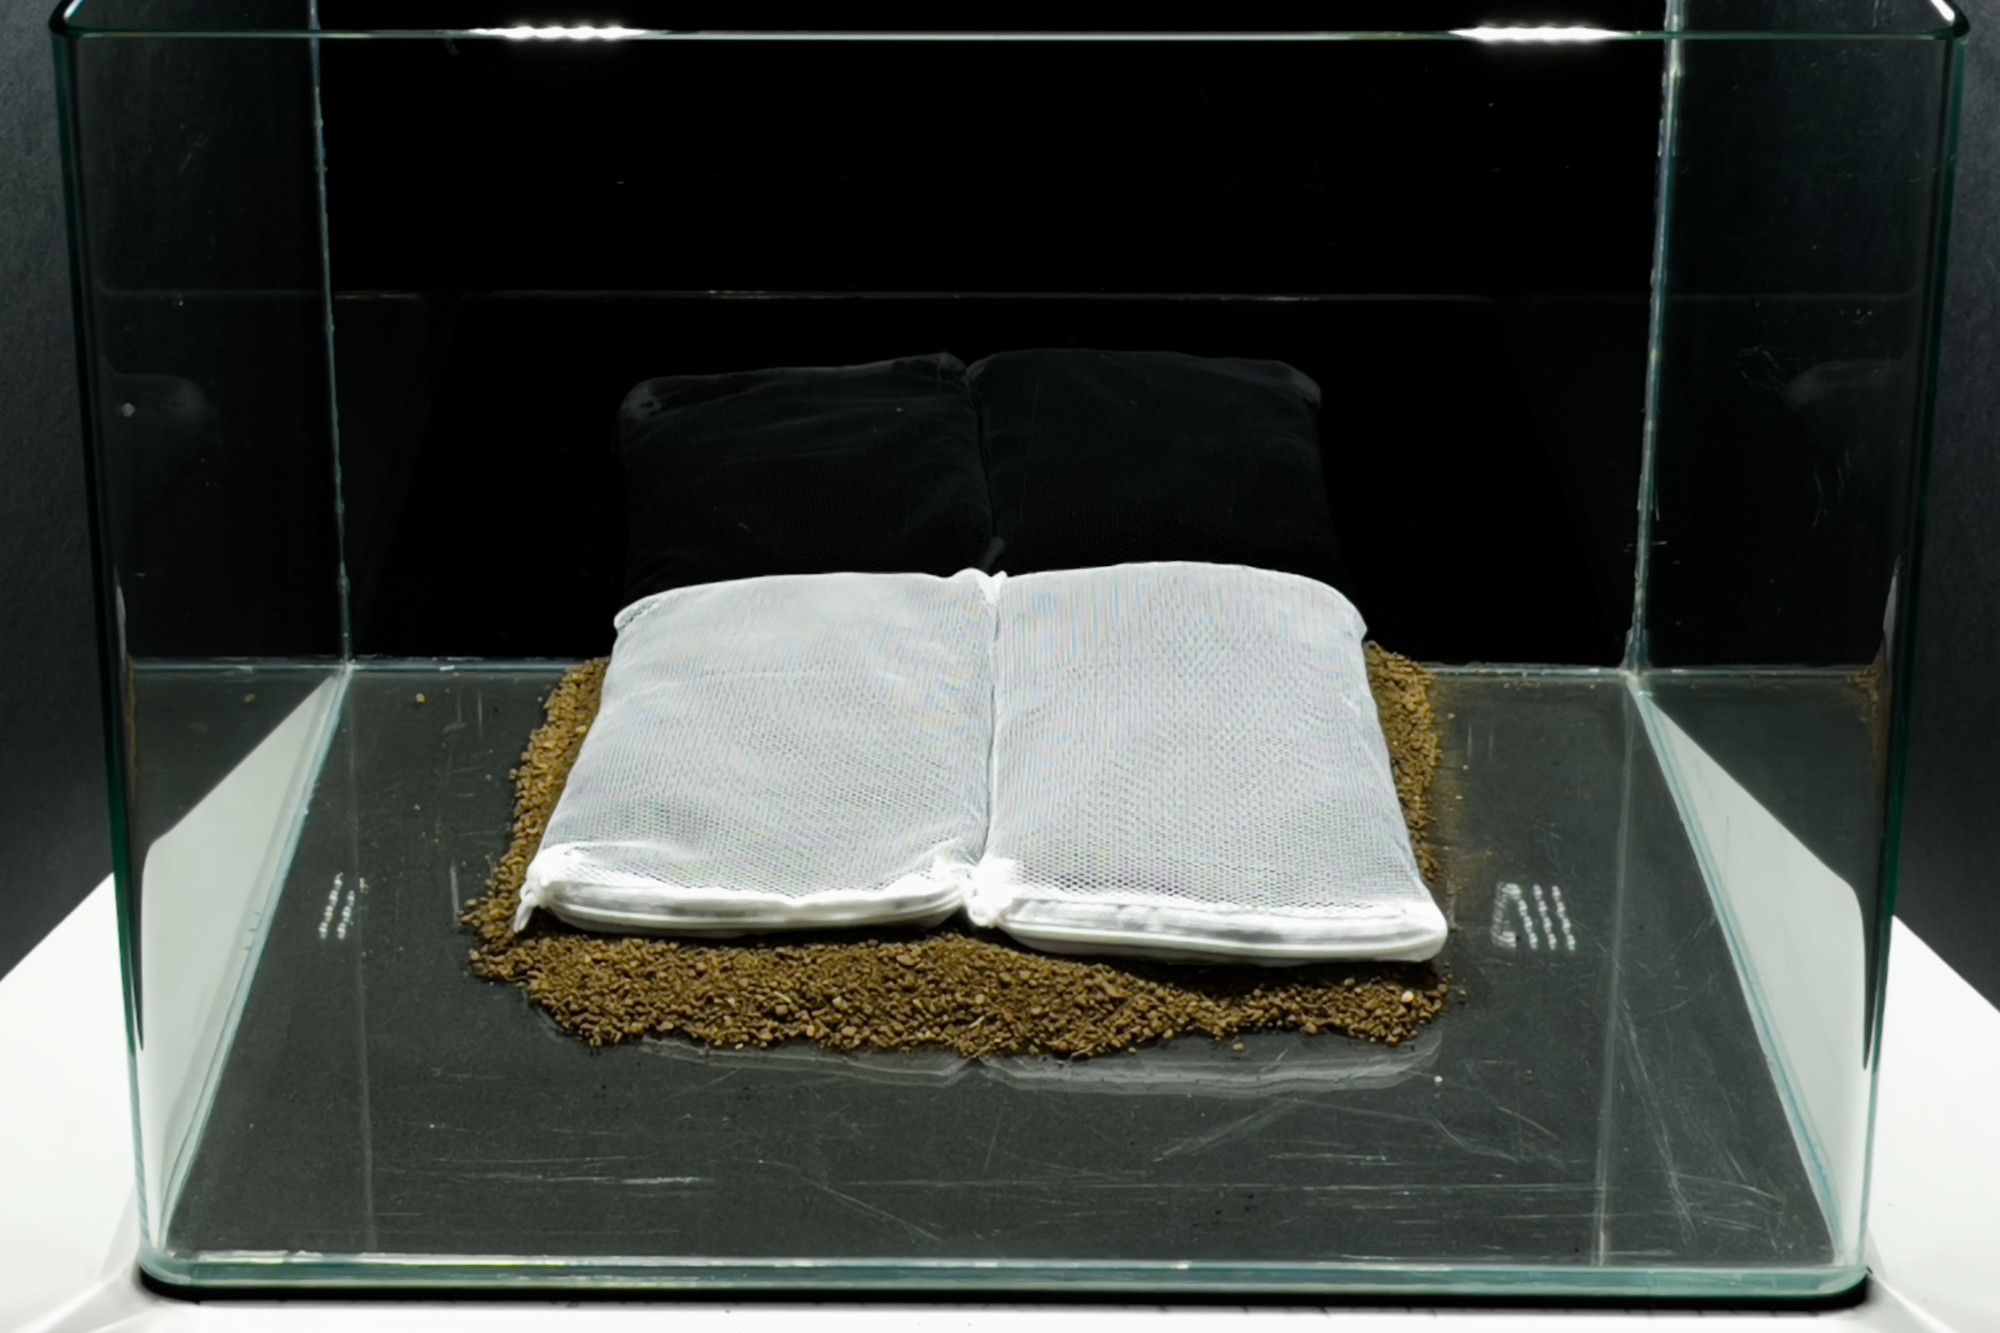
 2. Add a 1 inch / 2 cm thick layer of Fluval stratum soil on top of the Tropica plant growth substrate. Make sure to leave a 1 inch / 2 cm gap to the front and side panels, just like in step 1. **Optional:** You can also fill up two filtration bags halfway and place them carefully on the plant growth substrate.
This layer is important, as our plants will extract the required nutrients from it for growth.
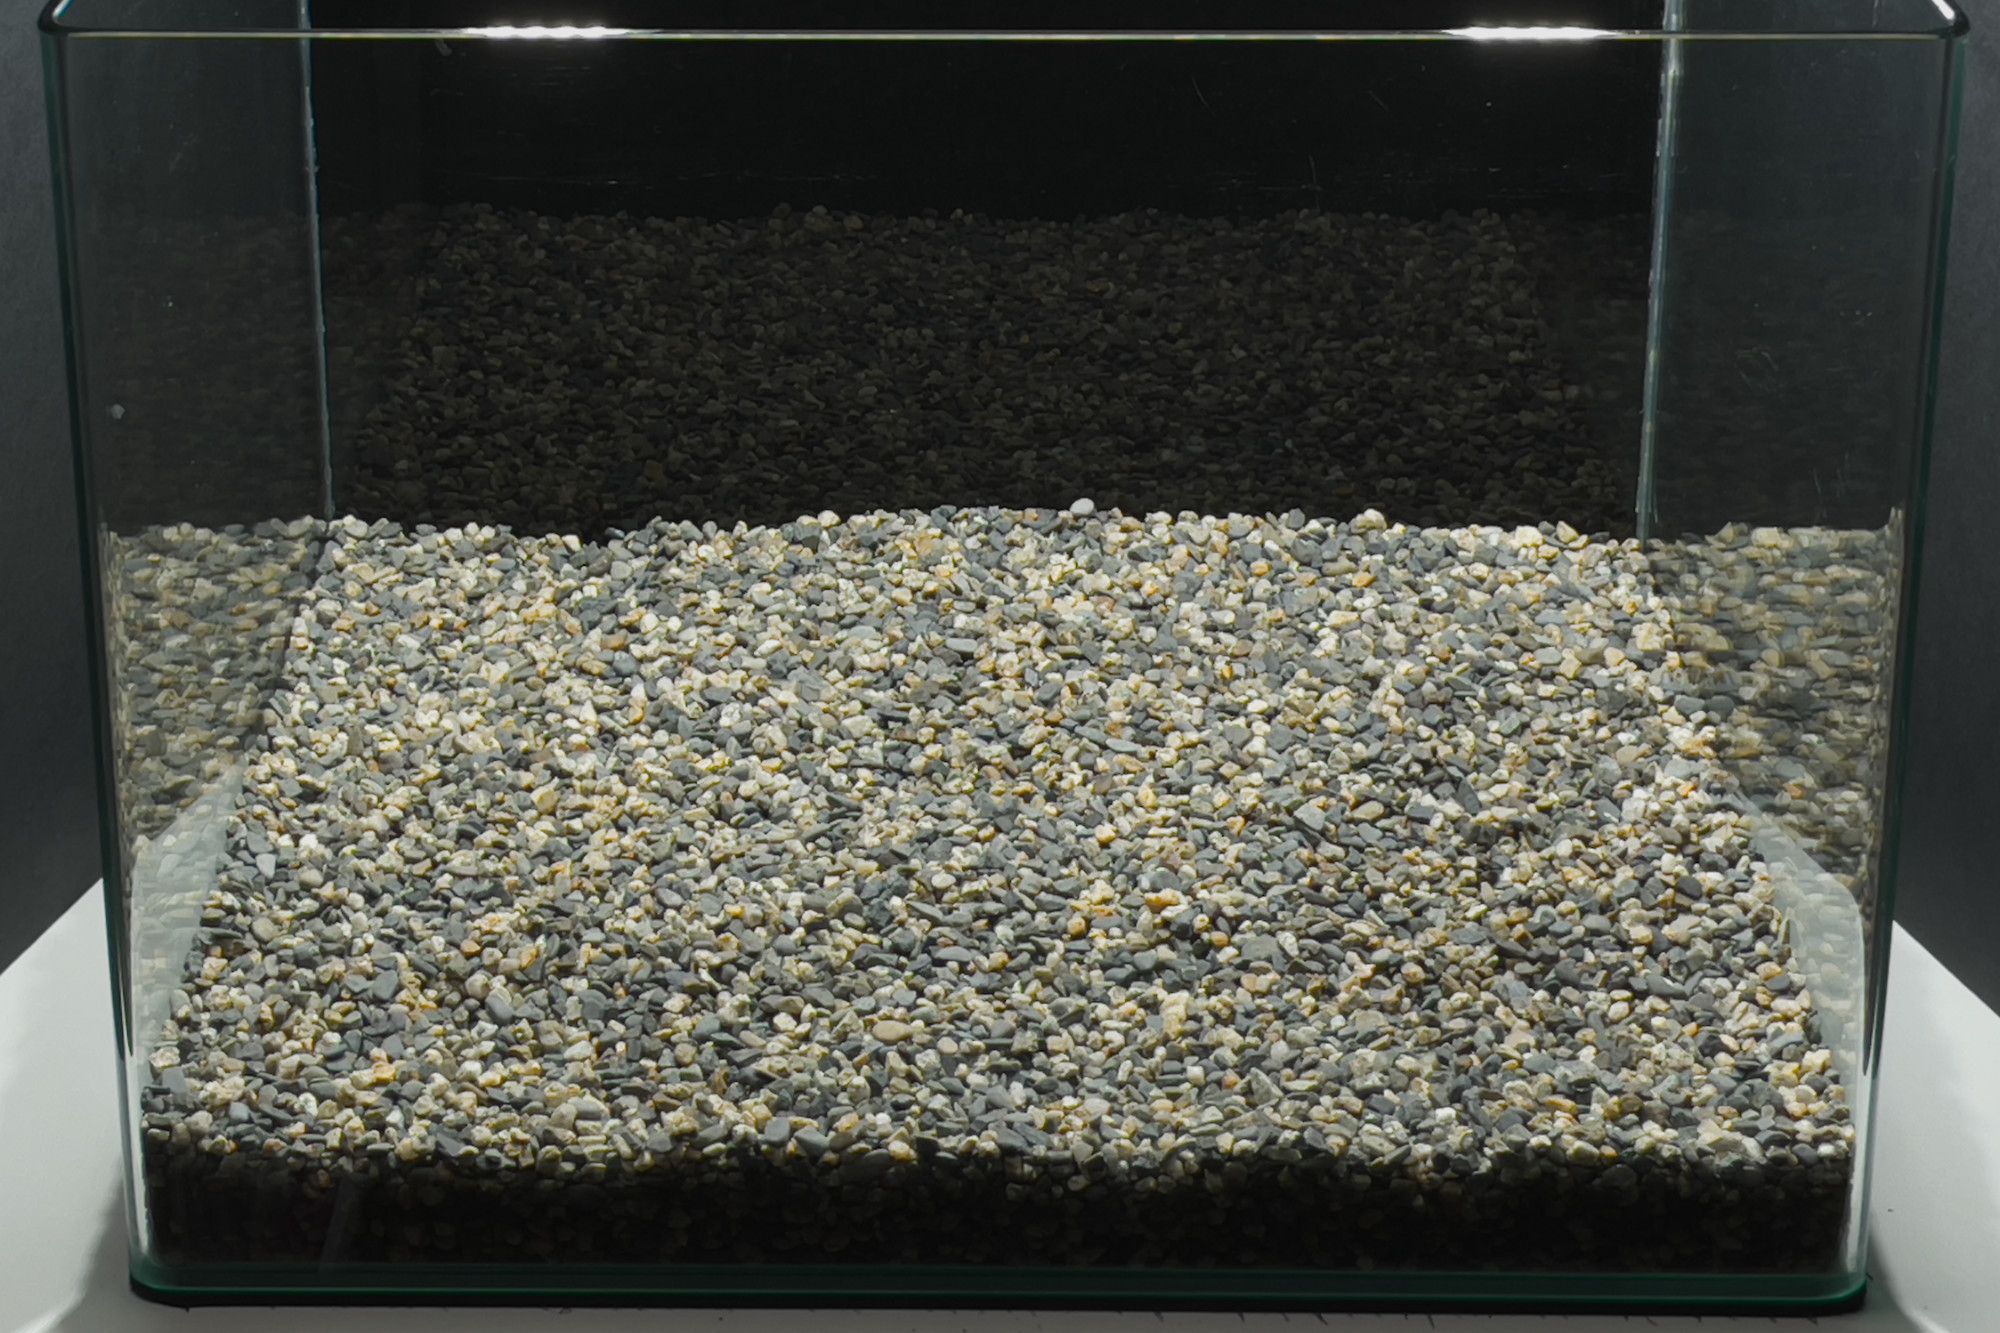
- Now we use the gravel to fill up the 1 inch / 2 cm gap between the already placed layers and the aquarium panels. As soon as these are filled, we will pour a 1-2 inch / 2-3 cm thick layer on top of the other layers. Make sure the gravel grain is 1/16 - 1/4 inch (2-7 mm) wide. At this point we do not want a smaller grain, because the grains would lay more densely together and the gravel needs space to breathe / process water flow. To add a bit more depth you can pile up more gravel at the back of the aquarium. This layer is important, as it will host the good and healthy bacteria helping to filter the water.
 4. On top of the gravel, we put a 0.5 inch / 1 cm thick layer of substrate (sand with 1/32 - 1/16 inch or 1-2 mmm grain). This gives the plants a better grip when being planted.
Planting
Before planting your aquarium, it is always a good idea to create a plan of how you imagine the final design of the tank to look like. This will make the process of planting easier, as you could otherwise quickly lose track of what you're trying to achieve.
To make planning easier, we always take a picture from the top of the hardscaped tank that we then use to plan the design on the computer. In this guide we didn't do a hardscape and stopped at adding substrate, so a simple sketch of the plant layout was sufficient. But of course, you can also use rocks and wood to create a more varied aquascape.
The result looked like this:
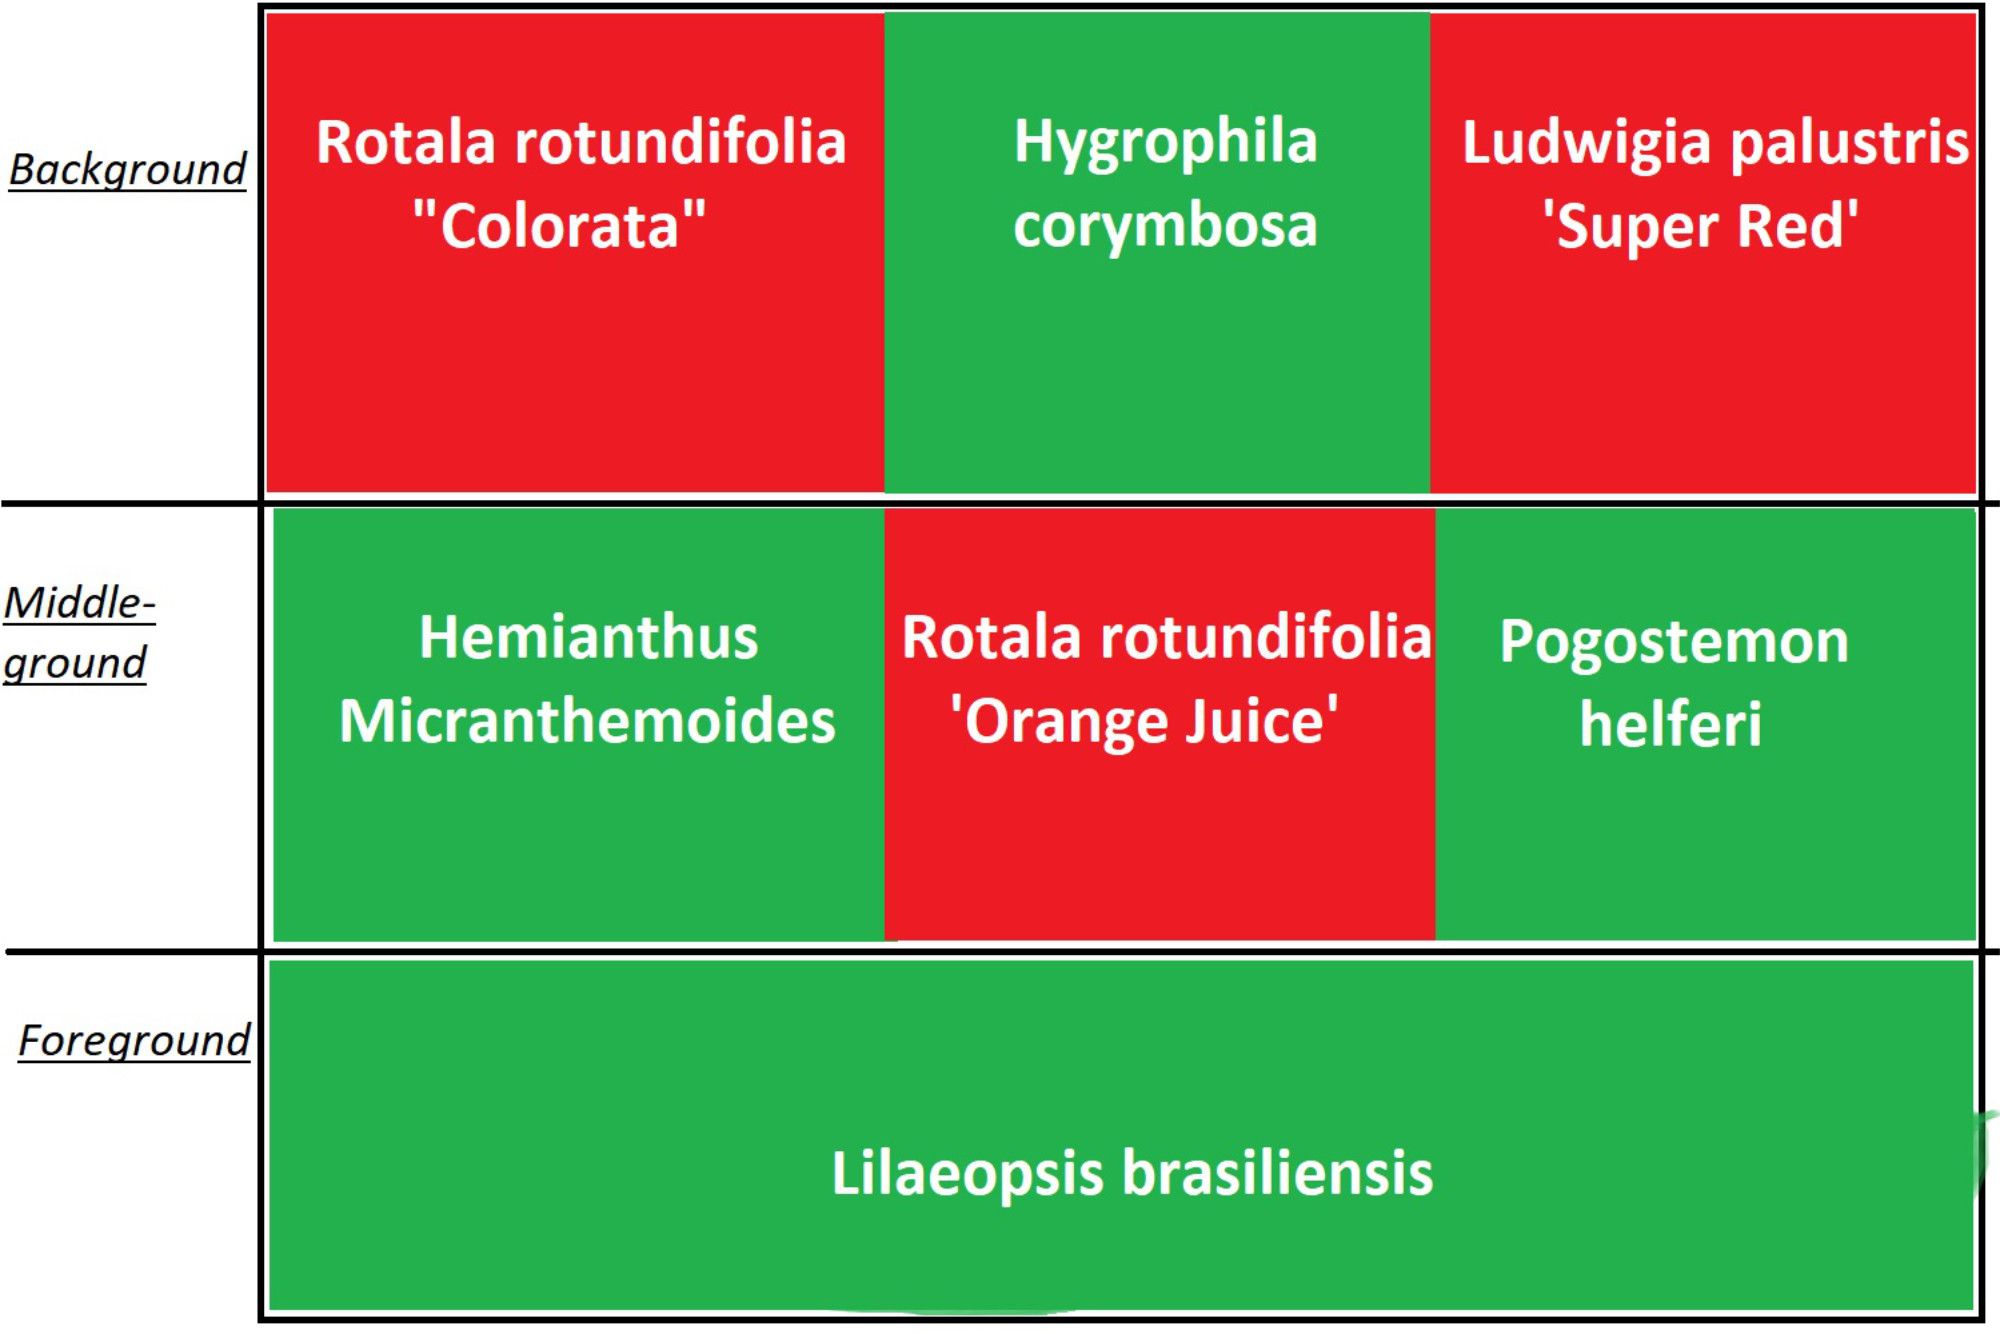
It is crucial to pick suitable plants for the foreground, middle ground, background and the surface of the aquascape. If you’d like to use different plants from the ones in this guide, you can always refer to the info box of our plant guides where we give a quick overview of plant requirements and ideal placement.
When it comes to planting, it is always good to break down the plants into small batches without harming the plants themselves. The more batches you get out of one plant, the more surface area can be covered.
For this aquascape we only used one pot or one "in-vitro" container per plant. We also recommend to follow a predefined planting structure in order not to lose the overview. For example here we don't mix different plants within an area and we plant the plants in rows with a bit of space in-between. By doing so, the plants have enough space to grow and develop.
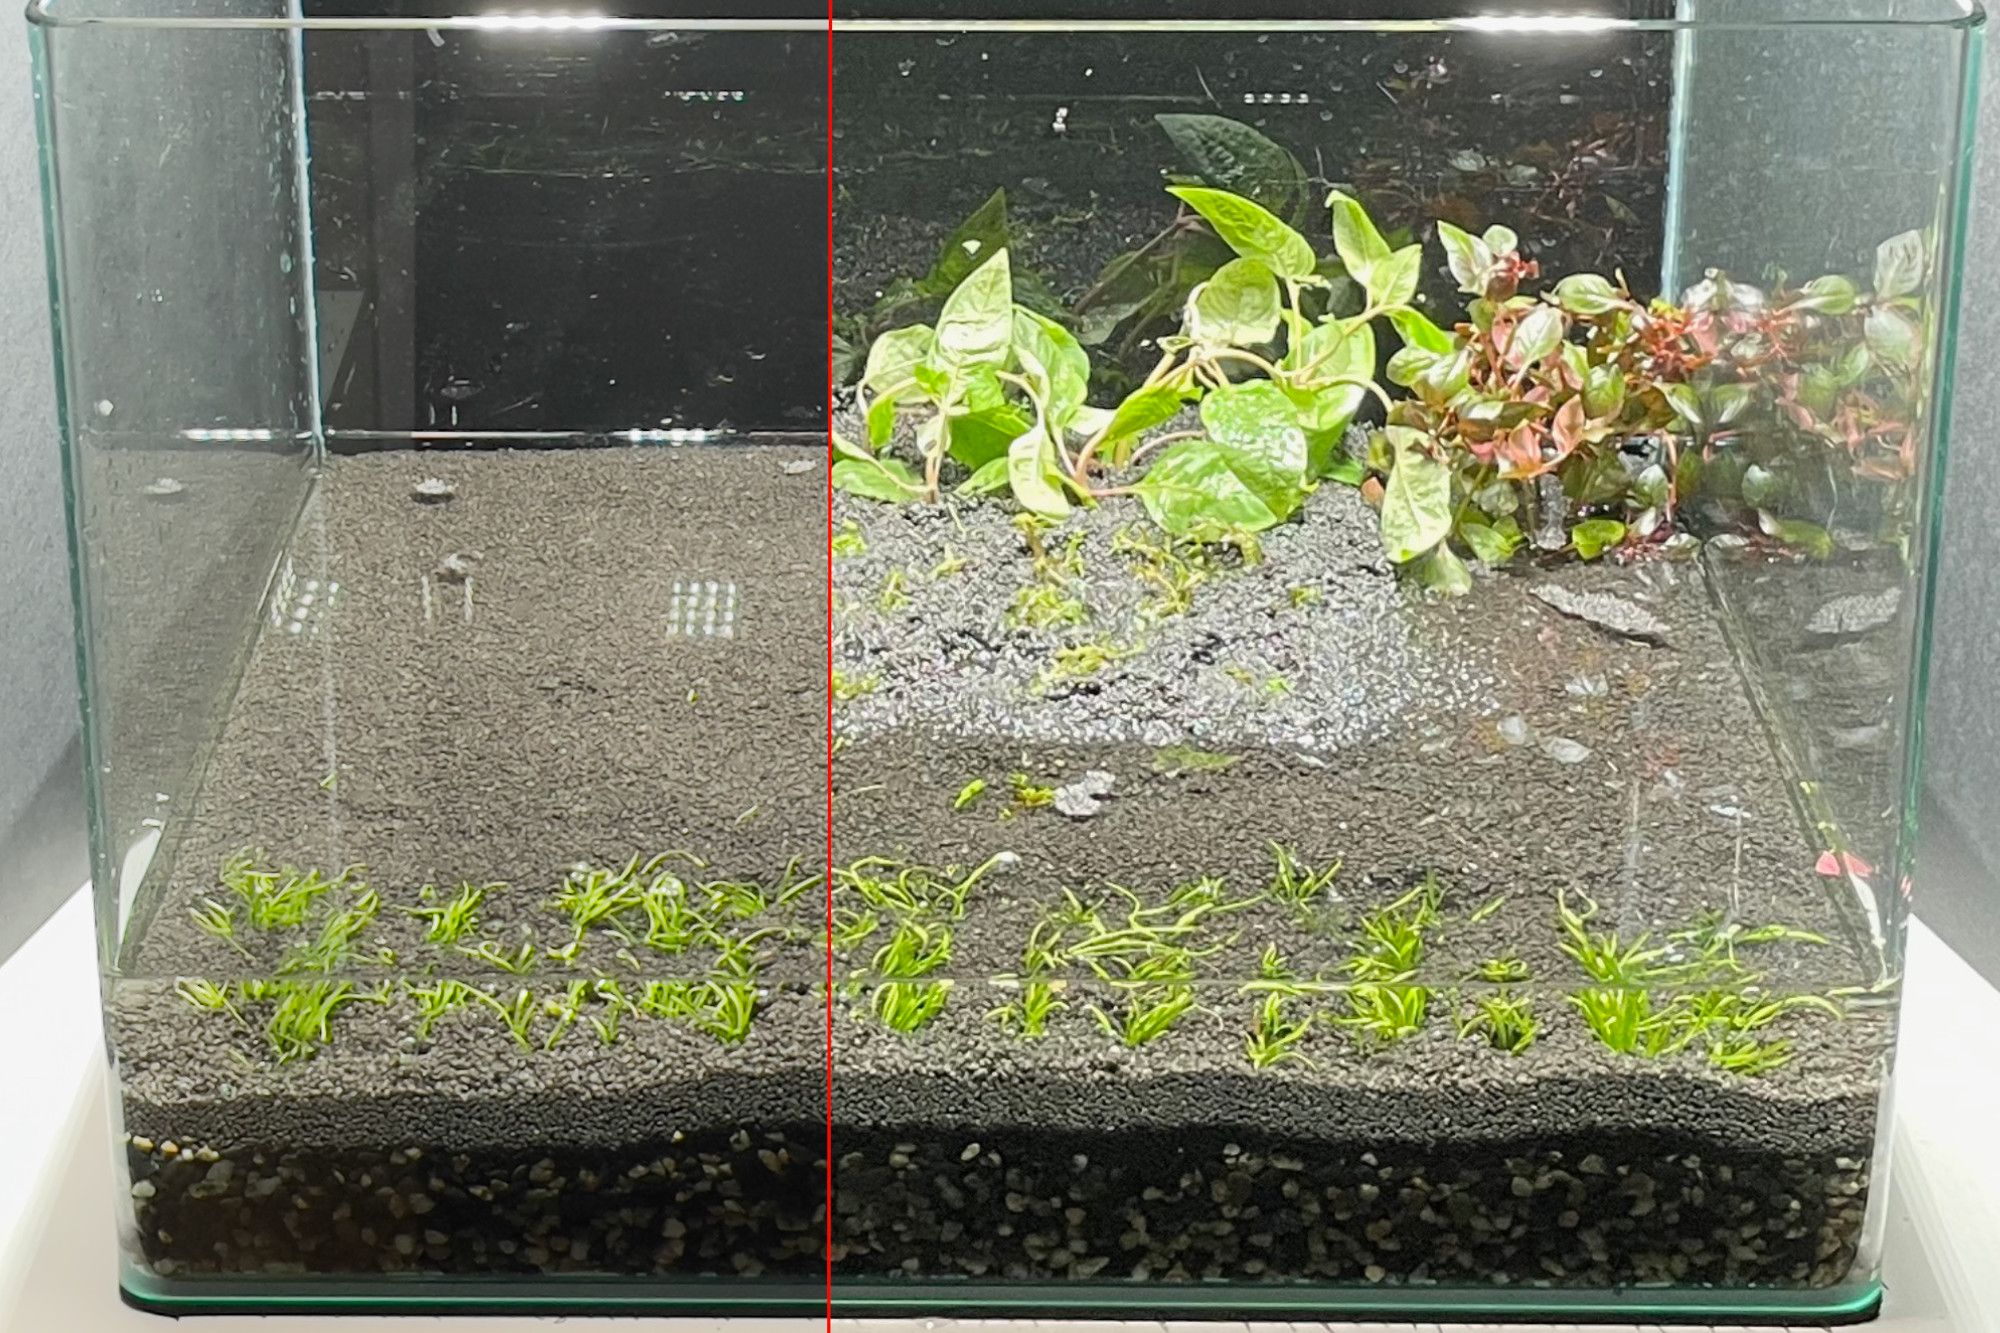
Since we don’t use any equipment in this tank it is also extremely important to choose plants that are very easy or easy to care for. Due to the lack of water changes we also need plants that grow fast or very fast, so that the nutrients in the water can be quickly filtered out naturally by the plants.
Fill with Water
Depending on the country you live in, your tap water might be chlorinated. When using chlorinated water, it is important to first dichlorinate it in a separate container using a dichlorination agent.
Afterwards you can use the dichlorinated water to fill up your tank. This step requires some patience and care as filling up the tank too quickly might lead to the plants being uprooted and the substrate layer messed up. You can either use
- a bucket
- or watering can with shower nozzle.
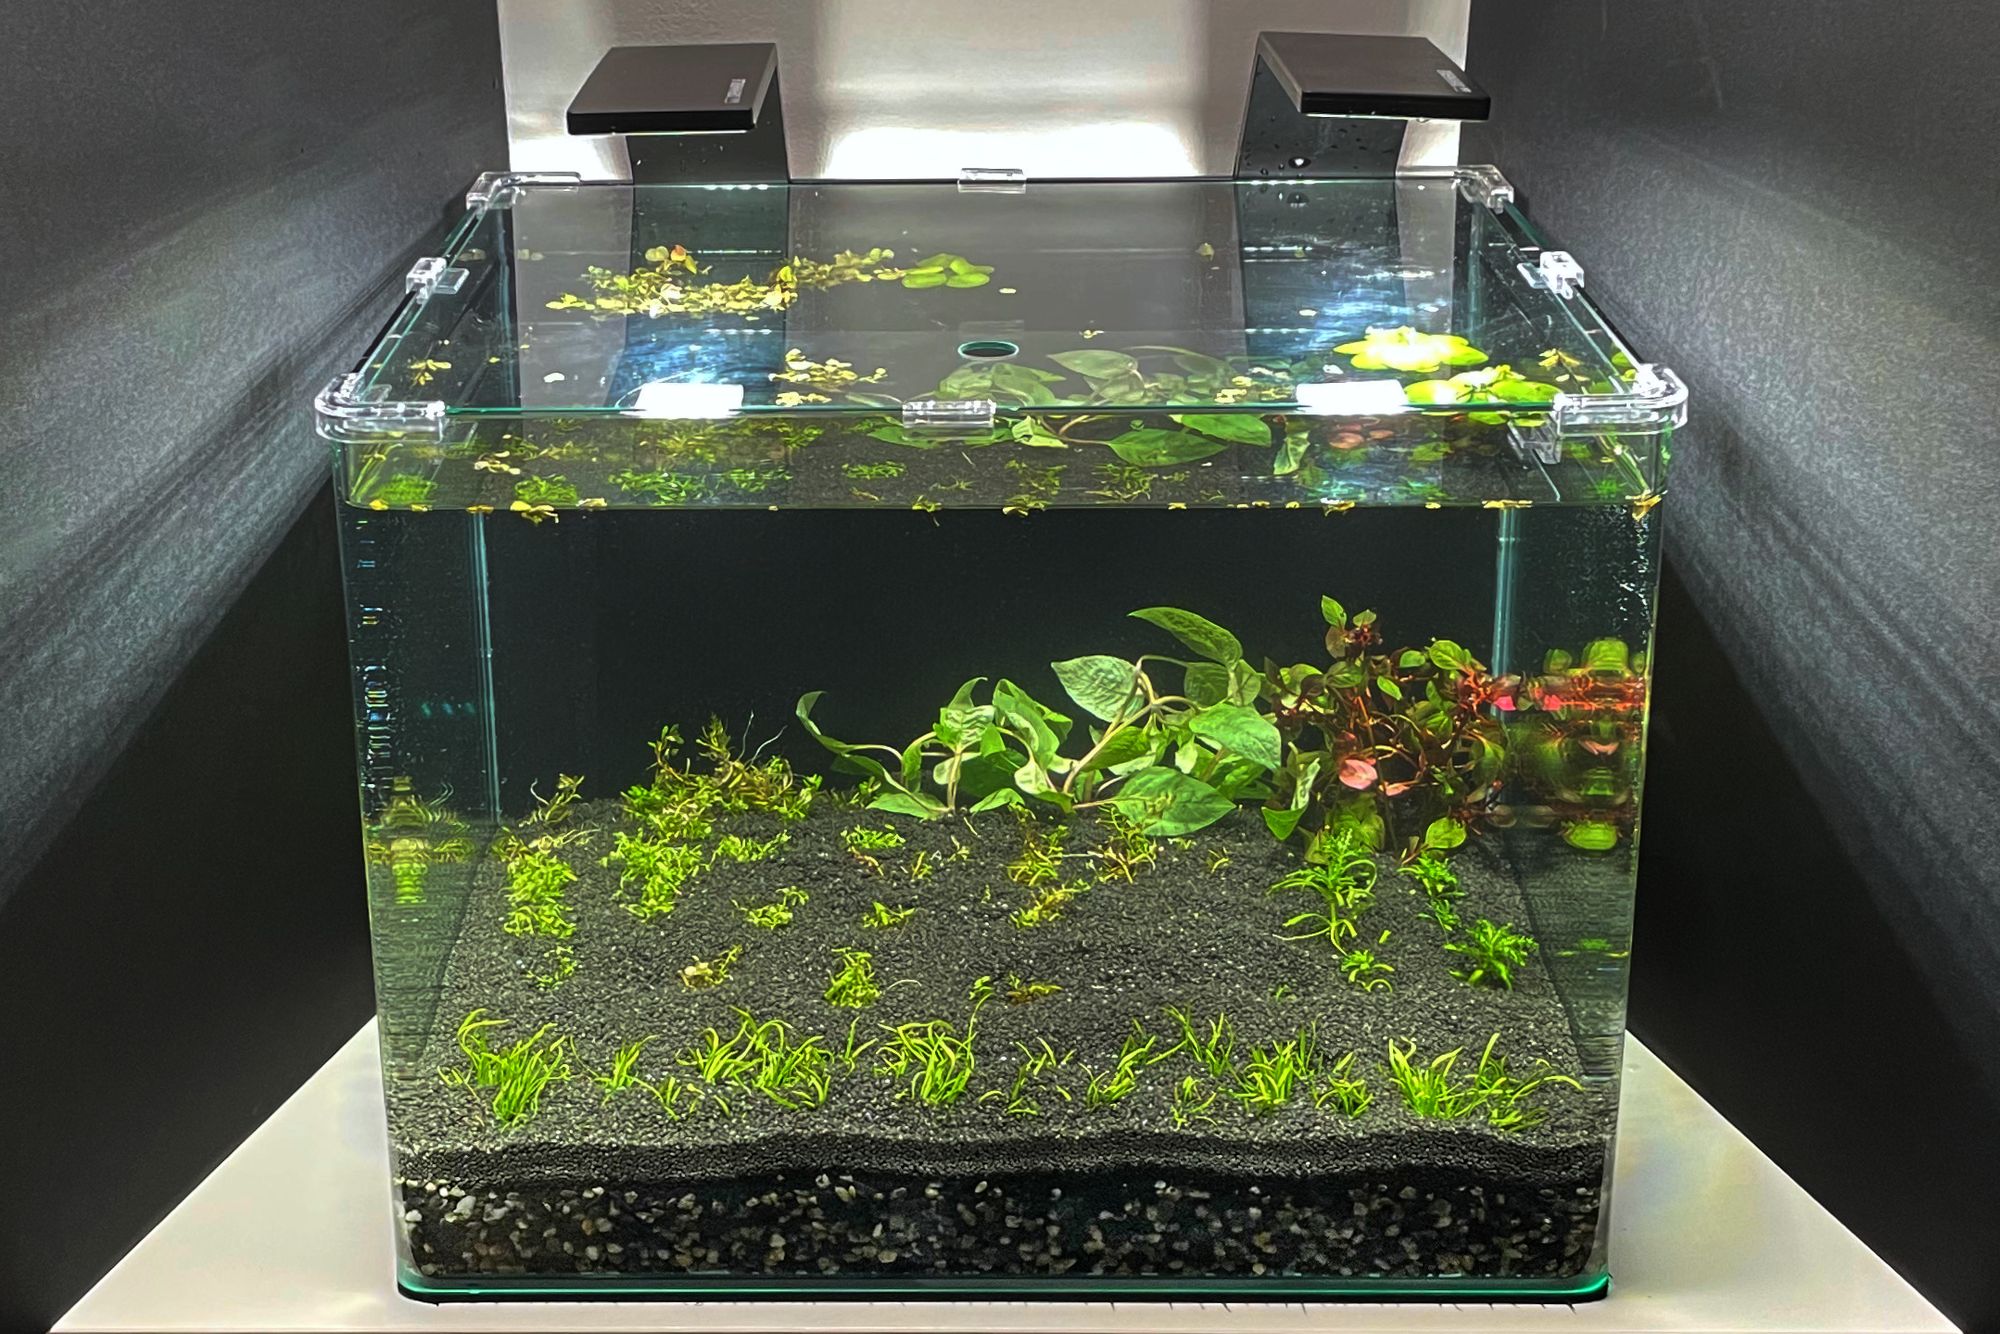
During this build we used a bucket in combination with the gravel packaging. We carefully and slowly poured the water on top of the gravel packaging. By doing so, neither the sand layer nor plants were messed up.
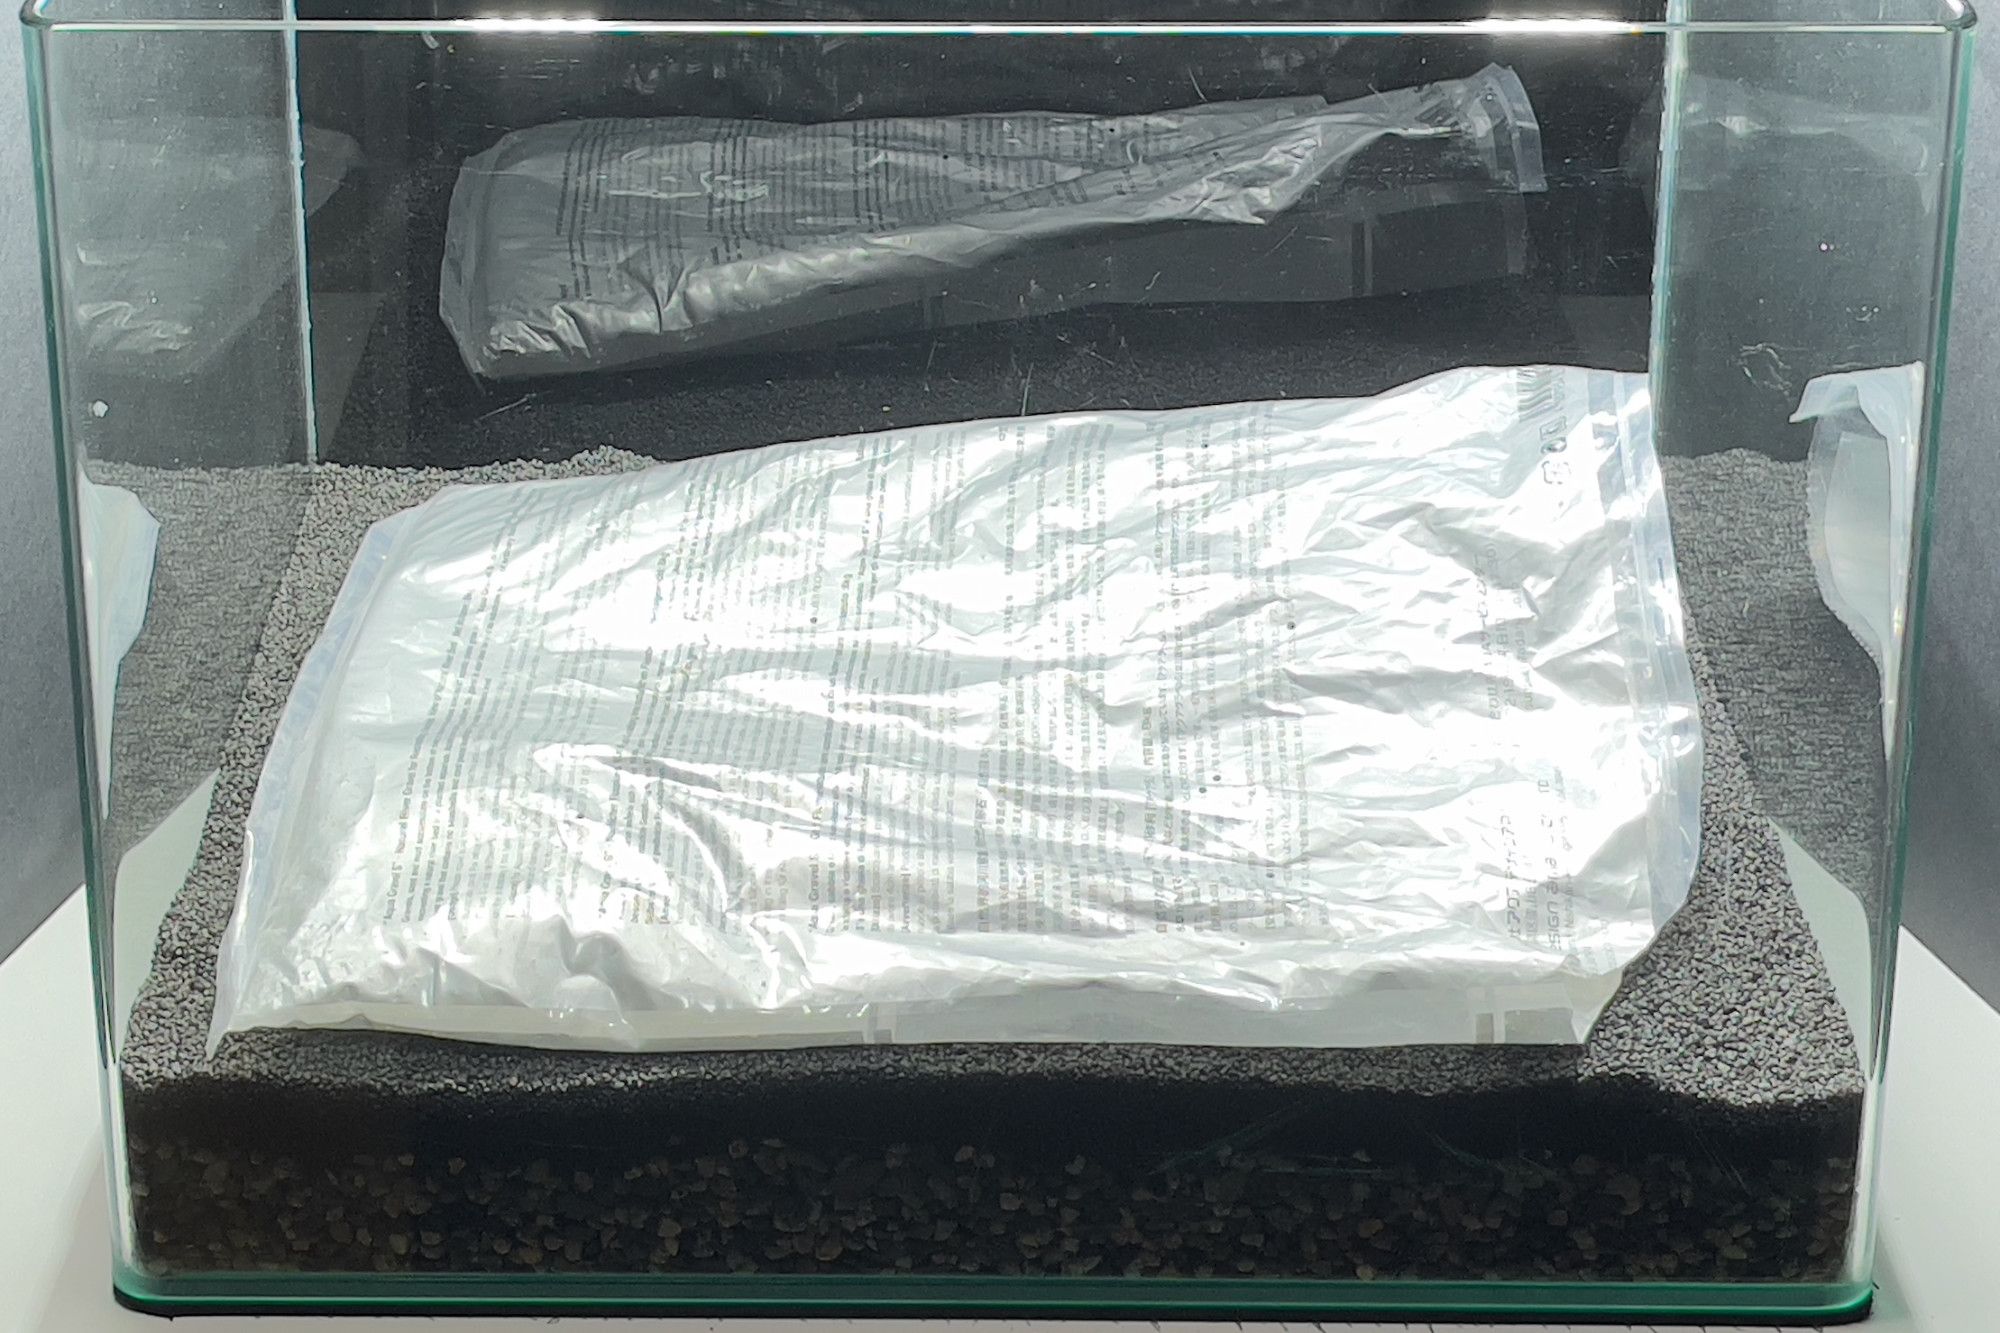
After filling the tank, make sure that no plants were uprooted and plant those which did uproot back where they belong. Remove plant residuals (e.g., with a fishnet) from the water surface to achieve a clean look.
Livestock
In the very beginning you can safely add two or three snails and up to five or six very small fish to the tank. We went with 5 tetra cardinal and 1 bladder snail. When adding livestock, it is important to distinguish between fish bought at the local store or online. Both options are fine, they just require two different methods of introducing the fish to your aquarium.
Adding Fish bought online:
Fish bought online should be delivered to your address within 1-2 days. Anything above that may result in an unpleasant surprise. Make sure you are able to receive the package yourself and open it right away to check the well-being of the livestock. In case of an unpleasant surprise most retailers demand a video within the first 2 hours of receipt.
If the delivery contains several packages of the same species, you can pour all of them into one big bucket. Make sure not to mix the species and in order to keep the stress level at a minimum, be relaxed and cautious.
For fish not purchased in you surrounding area, they definitely will have lived in different water parameters than you are going to provide. So, in order to help them adapt to your parameters, you can either use the dripping- or pouring method. Both methods slowly adapt the new fish to their future water parameters, the slower the better!
Dripping Method:
- You need a very tight hose like the one going from an air pump to an air stone.
- Stick one end into your current aquarium and suck on it until you see water coming through tube. Then press shut the hose to stop the water flow.
- Now tie a knot into the bottom end of the hose and tighten the knot until the water doesn’t pour anymore and only drips. Depending on the size of the bucket and the water in the bucket we recommend one drip per second. Now leave the dripping end of the hose in the bucket with the online bought fish.
- Check regularly on the bucket to make sure the water level is not spilling over the bucket's edges.
- When the water level is close to the bucket's edge, take half of the water out of the bucket with a cup or similar.
- After the water level rises again, pour out some more water and remove the hose.
- Turn off the aquarium light for a couple of hours (less stress for the fish and they might not hide).
- Get a fishnet to carefully scoop out the fish from the container (best one by one), make sure not to stress the fish and put them into their new home. This can take some time and you definitely need to be patient.
Pouring Method:
- Add a cup of aquarium water to the container with the new fish every 15 minutes and watch the animals carefully.
- When the water level is close to the bucket's edge, take half of the water out of the bucket with a cup or similar.
- Turn off the aquarium lights for a couple of hours (less stress for the fish and they might not hide).
- Get a fishnet to carefully scoop out the fish (best one by one), make sure not to stress the fish and put them into their new home. This can take some time and you definitely need to be patient.
Adding Fish from the local fish store:
When buying fish from the local fish store it is always important to ask what kind of water they are using. Most fish stores either use tap water or reversed Osmosis (RO) water. In case the store uses RO water, use either the dripping or pouring method mentioned above. If the store uses tap water, you can use the following steps:
- Place the bags with fish in your aquarium (so that the temperate can equalize).
- After 30 minutes or more pour the bags with fish into a bucket.
- Turn off the aquarium lights for a couple of hours (less stress for the fish and they might not hide).
- Get a fishnet to carefully scoop out the fish (best one by one), make sure not to stress the fish and put them into their new home. This can take some time and you definitely need to be patient.
If you decide to add livestock from the very start of a new aquarium setup you should test the water parameters in your tank daily. When you notice ammonia or nitrite spiking, it is absolutely mandatory to perform a 50% or more water change in order not to endanger the life and safety of your animals. This also applies when using the Walstad Method or a low-tech aquarium in general, like in this case.
Maintenance
After initial setup you can leave your tank alone for the coming weeks (apart from daily water tests and feedings if you have animals in the tank). Note that you will most likely encounter (dust) algae during this period. You don’t need to do anything to remove it, as the ecosystem will take care of them itself with time.
